Getting Your Trades In: File Imports and Brokerage Sync
Your transaction history is the ledger every position, profit figure and report is built from. This guide walks through creating a trading account, uploading a broker export or connecting a brokerage through SnapTrade, and checking that the rows actually landed.
What you are setting up and why
Everything MetisTrades shows you is built from one thing: a list of transactions. Open positions, closed positions, stock holdings, roll chains and analysis results are all built from the rows in your transaction history. Nothing is entered position-by-position — the app reads activity and infers the positions from it.
That has a practical consequence. A missing opening trade turns a closed position into a mystery. A missing assignment leaves shares with no cost basis. A duplicated fill doubles a premium total. The accuracy of every number downstream depends on the completeness of this ledger, which is why it is worth setting up carefully once rather than patching it later.
There are two ways to get activity in: upload a file your broker exports, or connect a brokerage through SnapTrade so transactions sync automatically. Brokerage connections are part of Pro. You can mix both — upload history for a period before you connected, then let sync handle new activity — and the app checks uploads against already-synced rows so the overlap is flagged rather than silently doubled.
One thing to hold in mind throughout: anything calculated from imported transactions is an estimate, including profit and loss, cost basis and tax figures. Tax numbers are not a substitute for your broker's 1099-B.
Before you start
- Decide how many trading accounts you need. A trading account is a container that keeps one broker's data separate. Transactions, duplicate checks and position building are all account-scoped, so give each brokerage account its own trading account rather than pouring everything into one.
- Export the right report from your broker. The uploader accepts CSV and XLSX files up to 10 MB. Interactive Brokers expects a Flex Query activity export. TastyTrade has two choices: pick TastyTrade for transaction history and TastyTrade (Desktop) for desktop-app order history.
- Know what you will pick in Select Your Broker. The list is Robinhood, Fidelity, Charles Schwab, thinkorswim, TastyTrade, TastyTrade (Desktop), Interactive Brokers, Universal Template and Other broker (AI-assisted).
- If your broker is not listed, either download the Universal Template and put your transactions into that layout, or upload the export as-is under Other broker (AI-assisted) and review the mapping the app proposes.
- Export as far back as the broker allows. Opening trades from earlier periods are what let the app match closes, build roll chains and estimate cost basis.
- Check the account switcher. Select a single trading account, not All Accounts, before uploading. The uploader still works under All Accounts but it skips the review dialogs, which can mean nothing is imported.
- Signing in matters. You can upload before creating an account, but that ledger stays browser-session data rather than saved account data; the app can offer to move it into a trading account after you sign in.
Step by step
1. Create the trading account
Open your user menu, choose Account Settings, then Trading Accounts. Select Add Account to open Create Trading Account and fill in Account Name (the example given is "Robinhood IRA"), Broker, and an optional Description. The Create button stays unavailable until the account has a name.
Look at how each row carries its own name, broker type and optional description — that is what keeps two Schwab logins, or a taxable account and an IRA, from blending together.
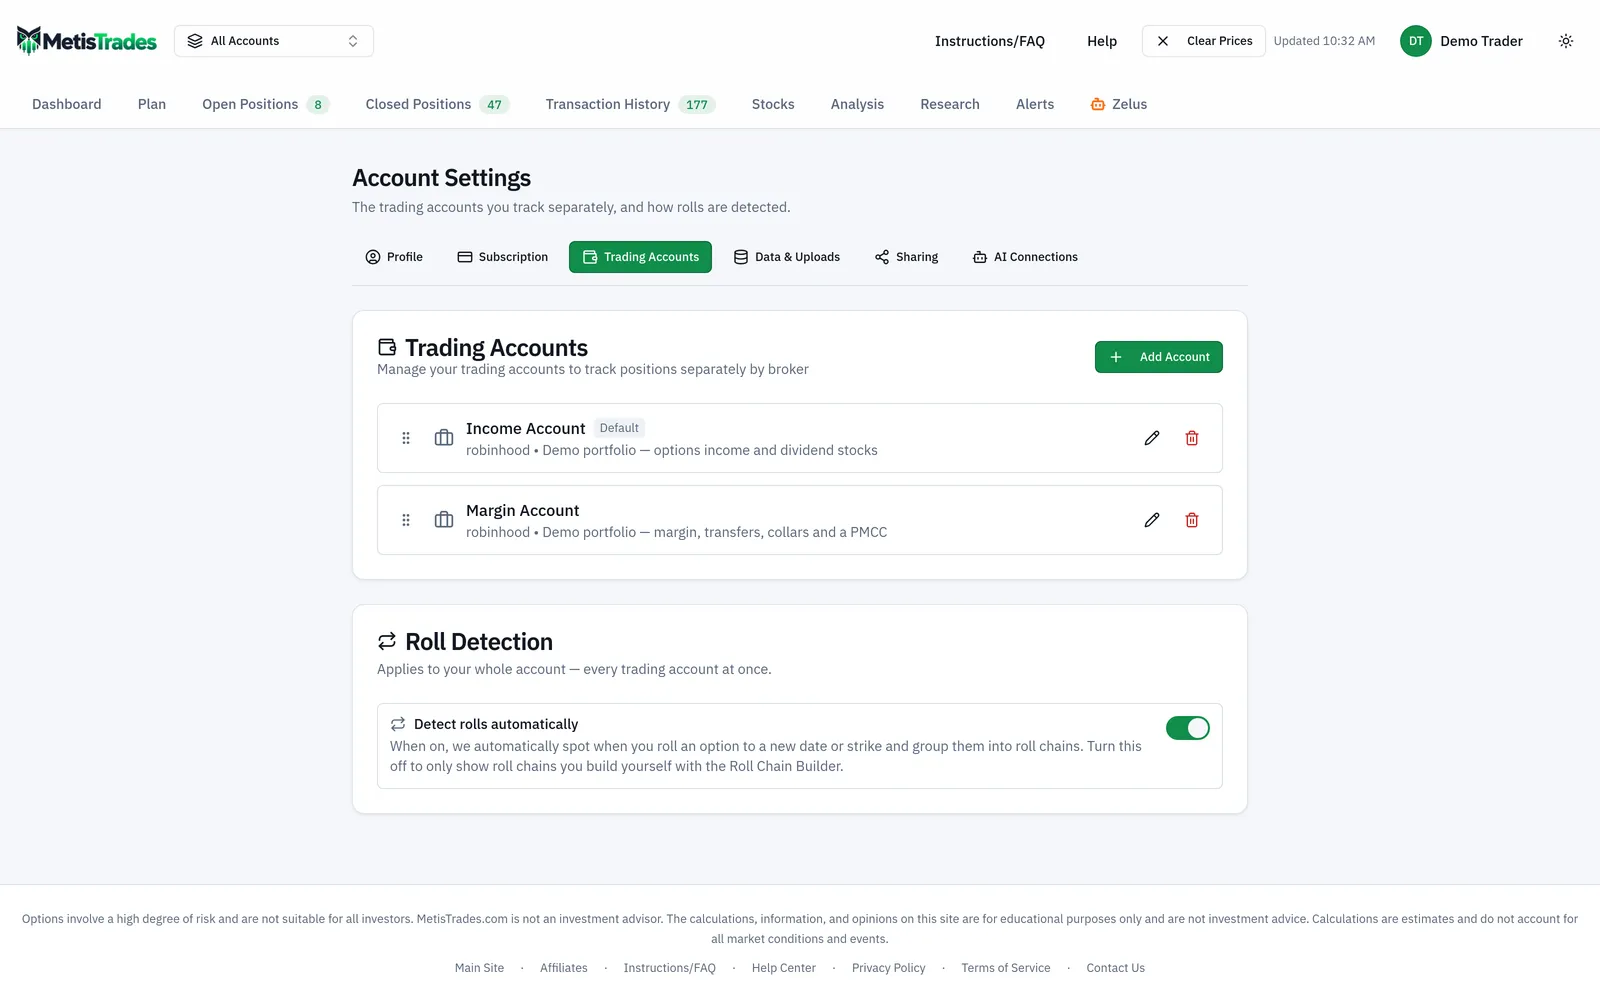
Two accounts can share the same broker type, so give them distinct names. You can drag rows to reorder them, and the delete control only appears once you have at least two accounts.
2. Upload a broker export
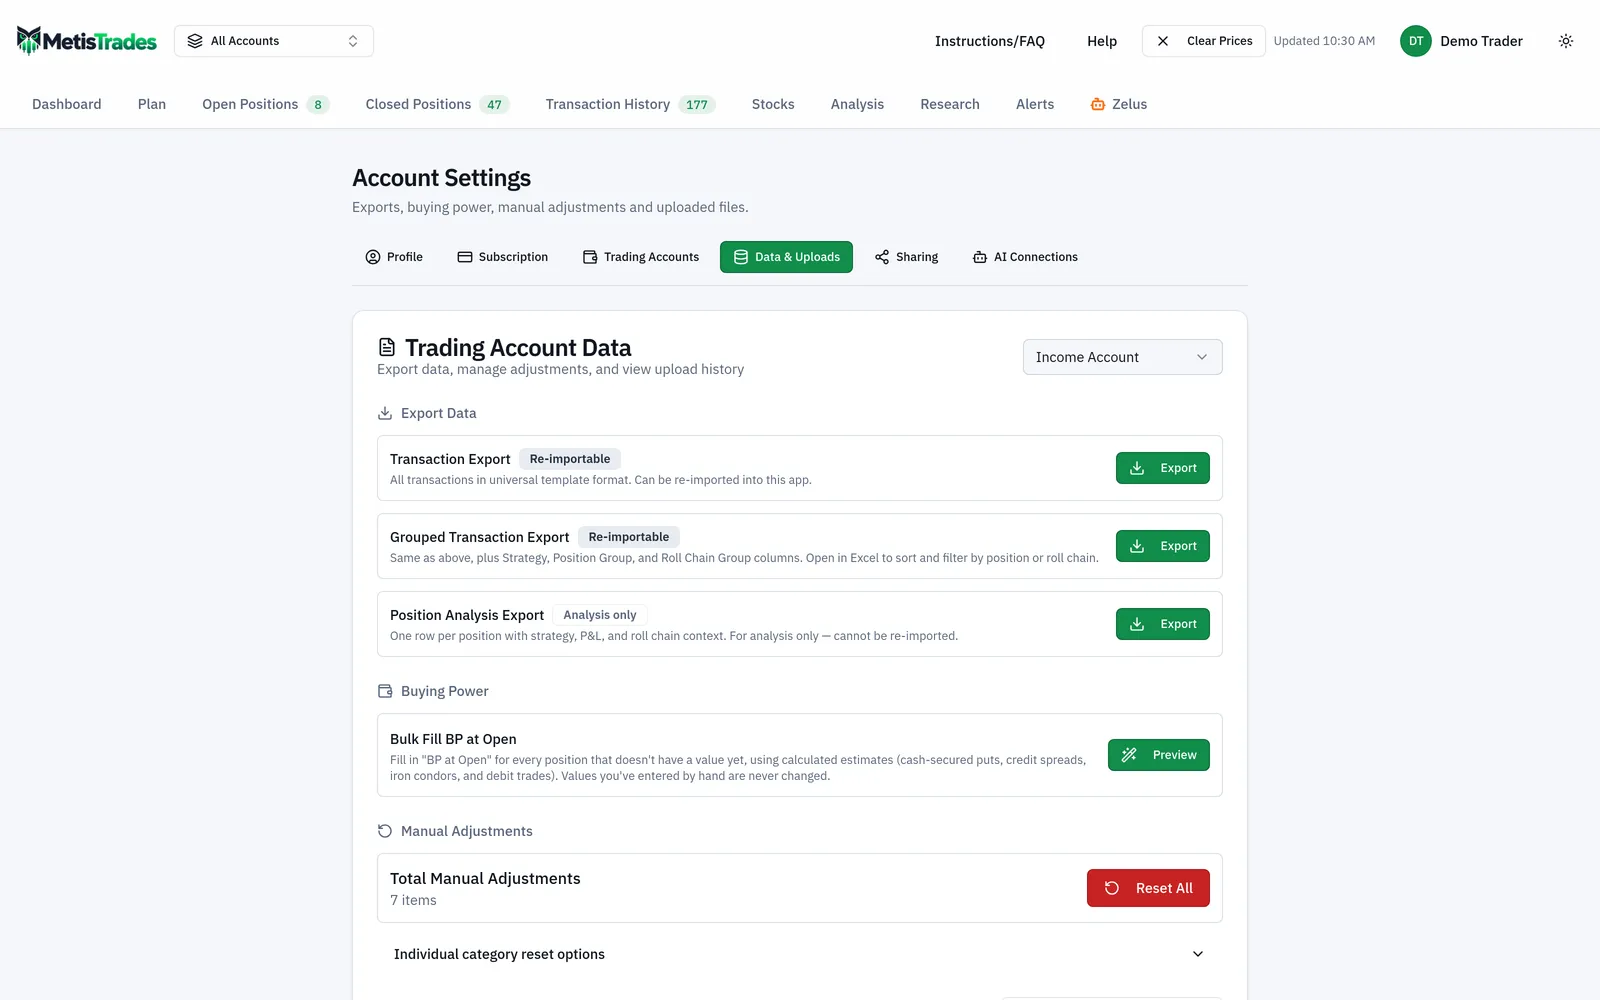
Go to Account Settings → Data & Uploads. Confirm the account at the top of the card with Select account, then in Upload History choose Select Broker and select Upload File. You can also start from the upload area on the dashboard; the broker list and review steps are the same, but the results stay wherever you started.
Notice where the pieces sit on this card: the account selector at the top, the export buttons, Download Universal Template, the broker menu with Your saved mappings underneath it, and the upload list that will record this file.
Before anything is saved, the upload may stop and ask you something. Each prompt imports nothing until you answer it:
| Prompt | What it means |
|---|---|
| This looks like a … file | You chose Other broker (AI-assisted) for a file the app recognizes. Use the named broker's parser unless you specifically want to map columns yourself. |
| We don't recognize this format — let AI map it? | No importer knows this layout. Agreeing sends only the header row and a bounded sample of rows to an AI model, which proposes a mapping for you to review. |
| The mapping review screen | The proposed column mapping, a preview of the first rows, per-row warnings and the percentage of activity rows translated. Change a field's source column, edit code rules, or mark a code as ignore, then refresh the preview. |
| The … import didn't work | A thinkorswim or Interactive Brokers statement defeated its own importer. You are offered a custom column mapping as an escape hatch. |
| Duplicate review | Rows look like manual or synced transactions already in this account. Skip selected duplicates, or import all anyway. |
If you used AI-assisted mapping and want to reuse it, tick Remember this mapping. A later file with the same header layout is then parsed straight away, and you can also pick any saved mapping by name from the broker menu.
3. Connect a brokerage instead, or as well
With Pro, open Account Settings → Brokerage Connections and select Connect Brokerage. The Select Your Brokerage dialog groups choices under Options + stocks, Options with gaps and Stocks & funds only — read that grouping before you pick, because it tells you how much option activity to expect. A brokerage marked Maintenance cannot be selected.
Authorize at the brokerage. You come back to the same section, where the connection shows a status badge. If it still says Waiting for brokerage authorization… checking automatically, use Check now.
4. Link each brokerage account to a trading account
Connecting only discovers accounts. Under Brokerage Accounts, use Select trading account on each row; it then shows Linked to: and the trading account name. One brokerage account can feed only one trading account. If the same brokerage account is visible through two of your logins, the page warns you — link it under one connection only, because linking both would import the same trades twice.
5. Run the first sync
Use Sync Now beside a linked account, or Sync All above the list. The initial history import can take several minutes for an account with substantial history; the status may read Initial sync in progress — SnapTrade is importing your transaction history. After that, syncs are event-driven: when SnapTrade reports fresh data, the app queues a run for the affected account.
6. Add the activity that does not arrive on its own
Four types are named as not syncing automatically: ACAT transfer bonuses, referral rewards, promotional credits and ACAT residual cash transfers. Open the correct account in Transaction History and use Add Transaction to record them.
Check it worked
Start in Transaction History for that account. Scan the oldest and newest rows against your broker statement, and check a few option rows for strike, expiration and direction. This is the ledger; if a row is wrong here, every figure built on it is wrong too.
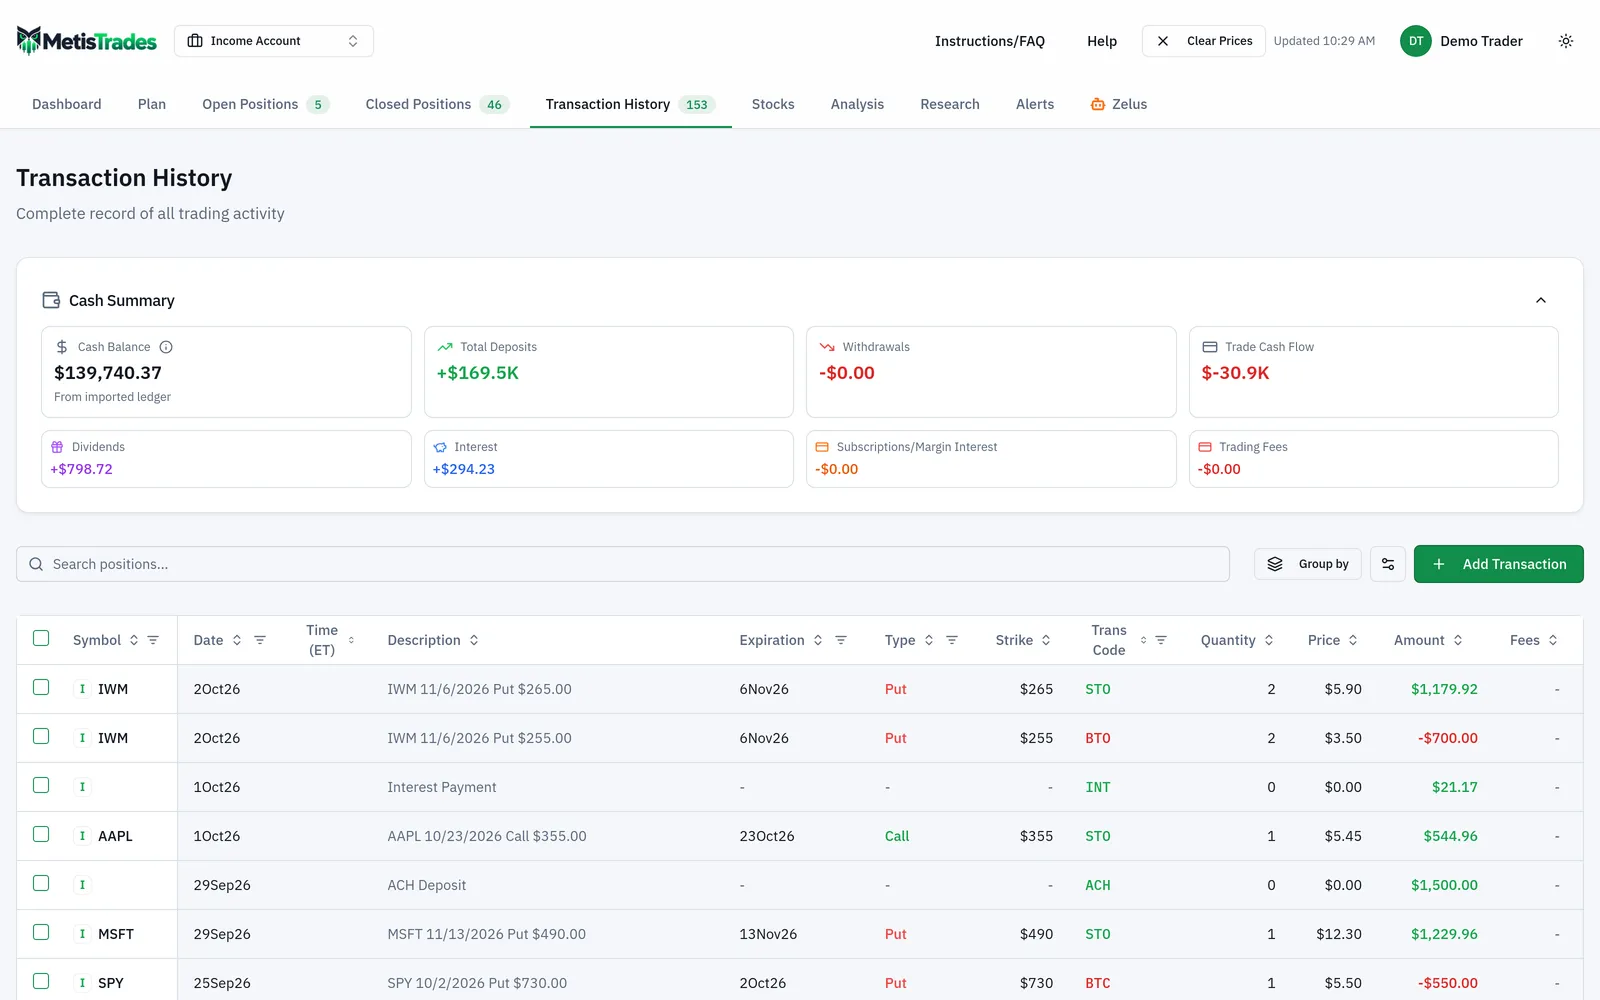
Then check the import's own report card. After a file upload, the completion message says how many new transactions were added and how many duplicates were skipped, and a note names which parser or mapping ran. The Upload History list should show the filename, transaction count and timestamp. After a sync, the account card shows Last synced:, the latest run's imported and skipped counts, and Broker data current through a date — which is SnapTrade's latest successful date, not a promise that a trade placed minutes ago is present.
Finally open Open Positions and Closed Positions. Positions you still hold should be there with the right quantities, and nothing should appear that you closed long ago.
The first signs something went wrong:
- An amber skipped-rows report headed with a count of statement rows couldn't be imported. Read it before trusting any total; the detail list shows at most 200 rows even when the total is higher.
- Upload Successful with Processed 0 transactions. That is the app telling you nothing was added — typically an overlapping file uploaded while the switcher was on All Accounts, where the duplicate review cannot open.
- Positions with impossible quantities, or closed trades that never opened. Usually a missing earlier export, or a file loaded into the wrong trading account.
Troubleshooting and common questions
My broker is not in the list
Use Other broker (AI-assisted) and review the proposed mapping, or Download Universal Template and fill in its required columns: Date, Symbol, Trans Code, Quantity, Price, Amount and Asset Type. A Contact us link in the uploader lets you request support.
The app rejected my file as a different broker's format
Your selection and the detected format disagreed. Choose the broker that actually produced the export. One mismatch is handled for you: select Charles Schwab and upload a recognized thinkorswim Account Statement and it imports as thinkorswim, with an Imported as thinkorswim notice and no change to the account's broker setting.
A skipped-rows warning appeared — did the import fail?
No. The listed rows were left out and everything else imported normally. Headings, footers and blank layout rows are not reported as lost activity, so what you see listed is apparent activity that was genuinely dropped. Add anything important with Add Transaction.
I uploaded a file into an account that also syncs
The upload flow warns you and checks the file against synced and manual rows, then asks you to review likely matches. If duplicates slipped through anyway, use Scan for Duplicates in Data & Uploads; it shows a match percentage and reasons for each candidate. Verify the row being kept before deleting, because deletion is permanent.
Same-day option legs were grouped wrongly
Many CSV exports carry a trade date but no execution time, and Time (ET) is blank where no usable timestamp exists. The position builder estimates grouping from symbol, date, option details, quantities and later close structure. If unrelated legs were combined, ungroup or split the position; if related legs were left separate, select their opening transactions in Transaction History and use Group as Position.
Today's trade has not appeared after a sync
The brokerage may not have updated SnapTrade yet, or on-demand refresh may be unavailable or rate-limited for that brokerage. Read the freshness note rather than assuming the newest trades are present, and sync again shortly.
When should I use Full Resync?
Only as a repair action. Sync Now reconciles the latest feeds with what you already have; Full Resync deletes the stored SnapTrade transactions for that trading account and re-imports the complete brokerage history. Uploaded and manual rows are left alone.
What happens to my data if I disconnect or my Pro access lapses?
Imported transactions are kept. Disconnecting one login stops syncing only for the trading accounts linked through it, and those accounts go back to CSV uploads. If a subscription ends, the Brokerage Connections section is hidden and automatic syncing stops, and it picks up again once access is active.
Related guides and help pages
Related guides
- Plan, Track, Optimize: a complete tour of MetisTrades
- Connecting a brokerage for automatic sync
- Uploading your broker's transaction file, with AI-assisted mapping for any format
- Setting Up Trading Accounts: One Container per Broker Portfolio
- Setting up an import with the Universal Template
- Exporting, inspecting and resetting account data in MetisTrades